Having a December birthday means that I grew up having a Red Velvet Cake every year!
Here we are on my 13th birthday. Mom not only made the cake, but she also made my blouse and skirt! She was quite a talented woman.

For some reason, this past holiday season, I didn’t manage to make the annual Red Velvet Cake, and I REALLY missed it! So, yesterday, when I dropped hubby off at the airport, I told him I was going to drown my sorrows with a Red Velvet Cake and endless hours of HGTV.
Phoebe and Hudson were excited about helping!

Here is the cake recipe. Please, please, don’t ever be tempted to use a boxed Red Velvet cake mix! This is so easy, and tastes SO much better! The tricky part is the icing, so I will post that recipe a little further down with some pics of the process.
Red Velvet Cake
½ C shortening
1 ½ C sugar
2 eggs
1 C Buttermilk
1TBSP vinegar
1 tsp vanilla
1 large bottle red food coloring
1 tsp baking soda
2 C flour
1/8 tsp salt
3 TBSP cocoa
Cream sugar, shortening and eggs. Add milk, vanilla, vinegar, and food coloring.
Combine dry ingredients and add alternately with sugar mixture. (if you have a KitchenAid just throw it all in at once)
Bake in prepared pan at 350° for 30 minutes. Test with toothpick.
Phoebe was in charge of Crisco.

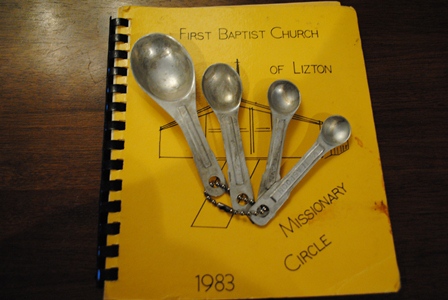
Sweet Hudson was in charge of pouring the sugar from his great-Grandma’s measuring cup.

Fortunately, it calls for two eggs, so everybody gets in on the egg-cracking fun!

Milk curdles faster in a warm spot, so we had the brilliant idea to set it on the mantle. It was chunky in no time! Milk mixed with vinegar replaces the buttermilk in the recipe.

Watching the KitchenAid work it’s magic!

The red batter looks so pretty!

One more shot of the batter, but mainly just so I can show off my new stove!! Isn’t it lovely?!

Now for the amazing, delicious icing! In my opinion, this is the only icing that should be considered legitimate for Red Velvet. Every time I see one with cream cheese icing, I die a little inside. Don’t get me wrong. I love cream cheese icing in its proper place, (BROWNIES or CARROT CAKE!) but it has no business on Red Velvet.
The recipe:
Icing:
2 C milk
7 tbsp flour
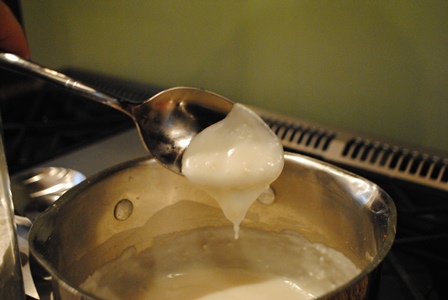
Cook until thick, almost like pudding, stirring constantly.
Cover with foil and let cool. It will become very thick. It needs to be completely cool before next step. I generally wait a couple of hours. Leave it covered with foil the entire time.
Combine:
1 C shortening
2 sticks butter, softened
2 C granulated sugar
2 tsp vanilla
Add to milk mixture and combine with mixer until fluffy. Best served cold!
Okay, so basically you are combining the milk and flour to make something like a roux. It should be very thick. VERY thick! If it is not thick enough, the icing will flop. Trust me on this. It was years before I got this part right!
Seven Tablespoons of flour is exactly right. The original recipe called for less, but I can’t make it work. It helps if you have your Grandma’s old measuring spoons!
Let the milk mixture cool completely. Stick it in the fridge if you want. I put mine on the front porch. Once it is cool, mix up the other ingredients in a separate bowl. Butter, Crisco, sugar, and vanilla. Doesn’t this look oh so healthy?!

Mix that up and dump it into the milk mixture. It will look like this:

Combine that together with a hand mixer, and then ice your cake! If you make a layer cake, use lots of icing between the layers. This recipe makes plenty! I put my cake on my husband’s grandmother’s cake plate. Just for the picture, I displayed her rolling pin next to it. I like to incorporate as many grandma items into my baking as possible!

Refrigerate the entire cake before serving. I put mine in the freezer for an hour. Or, if it’s chilly outside, stick it in the van for a while.

Isn’t it beautiful? It’s enough to make any lonely gal forget that her darling husband is 5000 miles away! Unfortunately, I over baked the cake, so you can see that it’s a bit dry. But my best girlfriend stopped by during the baking, and we got to chatting, and doggone it if I didn’t just ignore the sound of the timer going off!
One more word about the icing–I remember an ongoing debate between my mother and grandmother as to whether or not you could use this icing for decorating. Mom said no, grandma said yes. In retrospect, I think Grandma meant you could color a bit of it and write, “Happy Birthday” across the top of the cake. But my mother was also right. This is not traditional buttercream because it doesn’t use powdered sugar. It is definitely not stiff enough to do any real decorating. No flowers, borders, etc. Unfortunately, neither of them are around so that I can help them come to this resolution. But I am ever so grateful that they left me with a Red Velvet heritage!
I never knew your mom loved red velvet cake-love learning things about my good friend-I like it but never had it till few months ago-Barb
Sounds yummy. I have a December birthday also. Just wanted to stop by and say hi. I’ll at EBWW in April also. Hope you will stop by the “bird” table on Thursday evening and give me a shout back. Cakes sounds delicious!
Thank you, Barb! I don’t know if mom ever had Red Velvet Cake before she married into my dad’s family. She learned the recipe from my Grandma Lumpkin.
Hi, Ginger- I changed one thing that made the icing easier to make. I made the roux exactly as you described the first time, but it took a very long time, and the thickness was difficult to achieve without little lumps. But on the second try, I melted one of the sticks of butter in my pan, before adding the flour, mixed that together until creamy, and then slowly added the milk. It was much easier, faster, not lumps, and the icing was even creamier! Delicious cake!! Thanks for this recipe!
Thanks, Beth!! I will definitely try that next time. I’m so glad you enjoyed it!!